
Overview
- Coverage: UK and Switzerland (one storekit credential pool per region — see below)
- Driver network: Access to Uber’s extensive driver pool
- White-label: Your branding, not Uber’s
Do I need my own Uber Direct account? No. You do not sign up at uber.com, complete Uber’s business verification or obtain API credentials. storekit holds the Uber Direct credentials. You connect to them from the dashboard, create an Uber Direct organisation for your business and switch it on per store. There is nothing to request from storekit support first.
Before You Set Up Uber Direct
Uber quotes and bills each delivery from the pickup time and drop-off address storekit sends it, and storekit only sends a request for a delivery order. Have the store ready to take delivery orders before you switch Uber Direct on. A store that skips these steps ends up with paid orders and no courier.1
Enable delivery on the store
Go to Stores → your store → Settings → Operations and, under Fulfillment types, tick Delivery (keep Pickup ticked too if you also collect). Save. Without this, customers cannot place a delivery order at all. See Enabling Delivery.
2
Create at least one delivery zone with a fee
Go to Stores → your store → Settings → Delivery Zones → Add zone, draw the area and enter a delivery fee (the field is required — enter
0 to deliver free), then click Create zone. The zone decides which addresses can order and what the customer pays for delivery; Uber’s courier fee is billed to your organisation separately and is not passed on automatically, so set the zone fee with that cost in mind. See Delivery Zones.3
Set a realistic delivery prep time
On Stores → your store → Settings → Operations, under Preparation time, set the Delivery row to how long a delivery order really takes to prepare. This is the pickup time storekit sends to Uber when the order is accepted: too short and the courier arrives before the food is ready and waits at the door; too long and the customer’s ETA is padded for nothing.
4
Check the delivery slots and days
Go to Stores → your store → Settings → Pre-Orders and open the Delivery tab. Check the slot length (“Split each day into … time slots”) suits delivery — very short slots such as 5 minutes give customers a long list of near-identical times — and expand each day under Delivery times to confirm the hours you actually deliver. Slots come from these windows, not from your opening hours: a day with no delivery window offers no delivery slots, and a day with a window still offers slots even if the store is marked closed that day, so remove the window for any day you do not deliver. See Pre-Orders.
Setup
Everything is done from Stores → your store → Settings → Integrations → Uber Direct. The connection and organisation are shared by every store on your storekit account; the on/off switch is per store.1
Start the setup
Until your account is connected, the page opens on an introduction headed Deliver with Uber Direct. Click Set up Uber Direct to show the setup form. Read the guide opens storekit’s Uber Direct guide on storekit.com and does not change anything. Once the account is connected, the page opens straight on the settings below.
2
Connect a credential pool
In the Connect Uber Direct card, choose Credential pool and click Connect to Uber Direct. The pool list is fixed:
After the connection succeeds, the settings page opens. The setup checklist appears while there is setup to complete, above Delivery account settings. To connect another pool later, click the ⋯ button at the top right of the page header, next to the status and the on/off switch, then choose Connect another pool. There are no API key fields to fill in.
3
Create your Uber Direct organisation
In the setup checklist, click Set up next to Create your Uber Direct organisation. You can also open Delivery account → Edit → Create organisation. A panel opens. If more than one credential pool is connected, choose Credential pool. Fill in Organisation name, Contact first name, Contact last name, Contact email, Contact phone (international format, e.g.
+441234567890), Street address, Street address line 2, City, State / region and Postcode / zip. Country code is set from the credential pool and cannot be edited. Click Create organisation. Your business name, email and store address are pre-filled where storekit already has them.This organisation is created under storekit’s Uber Direct account and is what Uber bills for your deliveries. It is account-wide: every store on the account uses it unless a store has its own customer ID.4
Enable Uber Direct on each store
On each store, open Delivery account → Edit and choose Credential pool. Switch on Enable Uber Direct at the top of the page, then click Save in the top bar. Repeat on each store that should deliver with Uber.To use a store-specific customer ID, open Delivery account → Edit → Show advanced → Customer ID (optional).If saving fails with Please create an organization in account settings first, or enter a customer ID manually., go back to step 3.
5
Check delivery is switched on for the store
Uber Direct only handles delivery orders, so the store also needs delivery enabled and a delivery zone with a fee. See Enabling Delivery and Delivery Zones.
Billing. Uber bills the organisation created in step 3 directly for each delivery; storekit does not add the courier cost to your storekit invoice. Billing is activated on Uber’s side after the organisation is created, and Uber tells storekit when it is active — there is nowhere in the storekit dashboard to enter payment details for Uber Direct. If an order is paid but no delivery appears after setup, the most likely cause is that billing is not active yet: contact support with the order number and we will check the organisation’s status with Uber and, where possible, arrange the delivery manually.
Placing a Test Order
Before placing a test order, confirm Delivery account → Edit → Credential pool is a connected pool and Enable Uber Direct is on at the top of the page:1
Order on your own storefront
Open your storefront as a customer would, choose delivery, enter an address inside one of your delivery zones and pay for a low-value item.
2
Accept the order
In Live Orders the order arrives as Pending — click Accept order. If Auto accept orders is on (see below), it arrives already accepted. Accepting is what sends the delivery request to Uber.
3
Check the delivery was created
Open the order from Orders. The delivery tracker appears above the items once Uber has accepted the request, and Details → View in provider dashboard opens the same delivery on Uber’s side. If no tracker appears, see No Delivery Created for a Paid Order.
4
Cancel the delivery, then the order
Cancel the delivery first so no courier is dispatched: click Details on the tracker, then Cancel delivery and confirm with Cancel Delivery (or cancel it from the Uber Direct dashboard). Then close the order in storekit: open it from Orders, click Refund in the Payment section to return the test payment (see Refunds & Payouts), and use More actions → Cancel order (confirm with Cancel Order) to take it off the board. Neither refunding nor cancelling the order cancels the courier request, which is why the delivery is cancelled first.
The ticket for an Uber Direct order prints on your storekit printer exactly as any other delivery order does. Uber Direct changes who carries the order, not how it reaches your kitchen — there is no Uber printer and nothing to set up on the Uber side for tickets.
How It Works
- A customer places a delivery order on your store.
- When the order is accepted, storekit requests a delivery from Uber Direct with a pickup time based on the store’s prep time (or, for pre-orders, the scheduled delivery time).
- Uber assigns the nearest available driver.
- The customer tracks the delivery on your order status page.
- The driver delivers the order.
Do I Still Need to Accept Orders?
Yes. The delivery request goes to Uber only when the order reaches Accepted in storekit — a Pending order never gets a courier. An order reaches Accepted in one of three ways:- Manually: click Accept order on the order in Live Orders.
- Automatically: at Stores → your store → Settings → Operations, under Auto Accept, switch on Auto accept orders. Every incoming order is then accepted the moment it is placed, and the Uber request is sent straight away without anyone touching the dashboard. The same toggle is under Operations in Live Orders.
- From a connected POS: integrations such as Lightspeed, Toast, Deliverect and Tissl mark the order Accepted in storekit when the POS takes it, so there is nothing extra to press in the dashboard.
Order Data Sent
Standard deliveries are set to be handed over at the door, with the driver taking a photo as proof of delivery and leaving the order at the door if the customer cannot be reached. Catering deliveries instead use a PIN code the customer gives the driver, and are returned to the store if they cannot be delivered.
There are no Uber Direct dispatch-timing, pickup-instruction, delivery-requirement or tipping settings in the storekit dashboard. Dispatch always happens on acceptance, and what the customer pays for delivery is set by your delivery zones, not by Uber’s courier fee.
Following a Delivery in the Dashboard
Open the order from Orders and the delivery tracker appears above the order items as soon as Uber has accepted the request. It shows the Uber Direct logo, the current pickup or drop-off ETA and a progress bar through Pending, Assigned, En route, At dropoff and Delivered. Once a courier is assigned, their name, phone number and vehicle appear under the progress bar. The tracker updates live while the order page is open — there is nothing to refresh.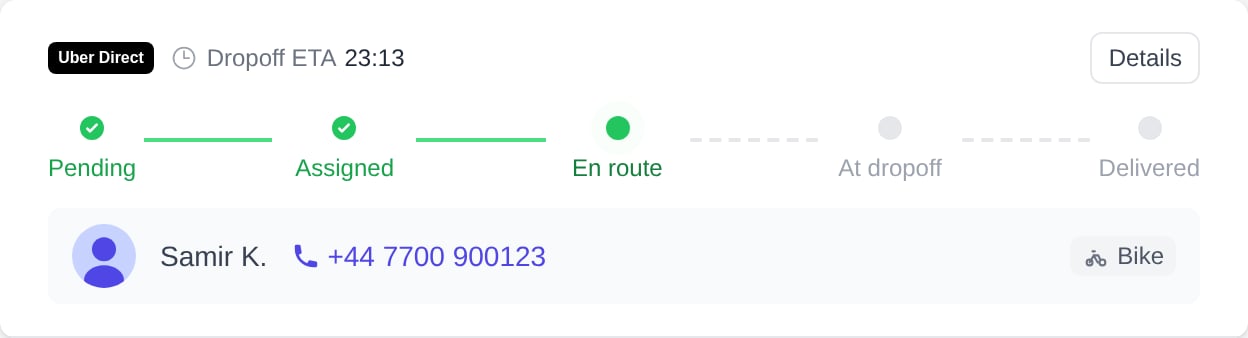
The delivery tracker on the order page (example data)
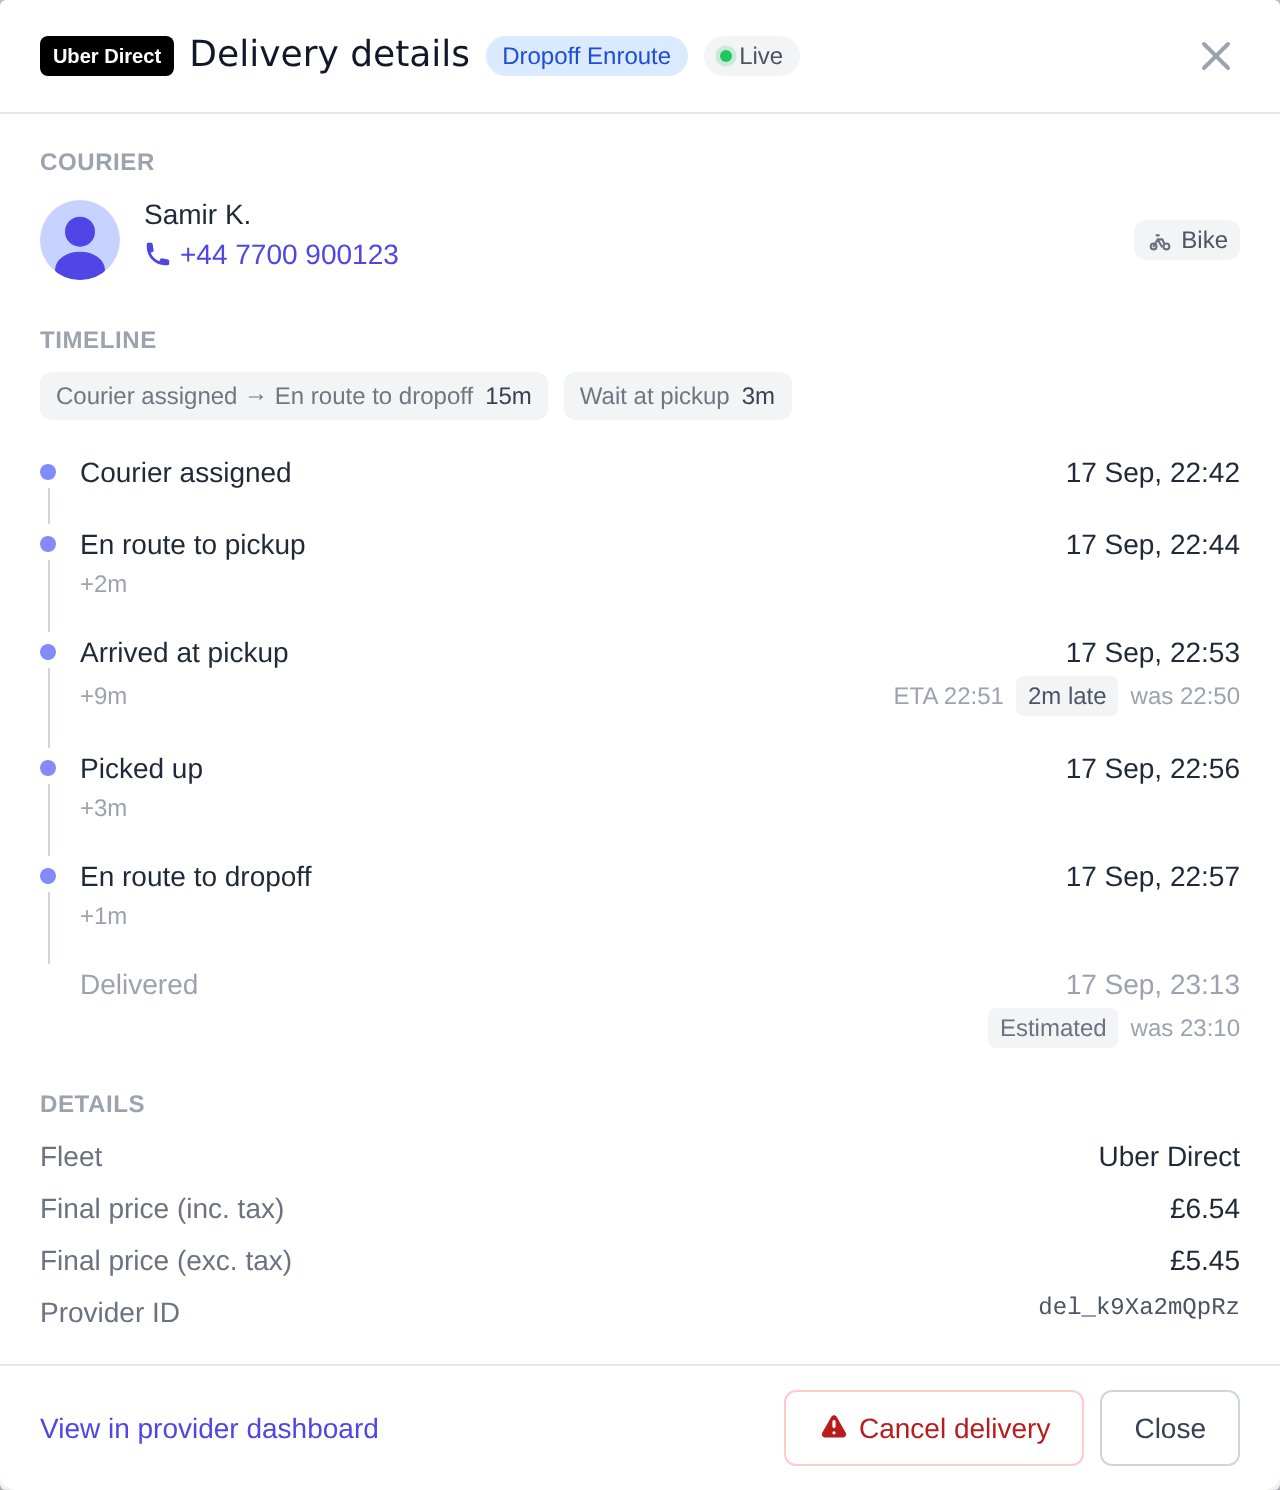
The Delivery details panel while a courier is en route (example data)
The Cancel delivery button at the bottom of the panel cancels the courier request with Uber. It is only shown while the delivery can still be cancelled — once the order has been dropped off, is being returned to the store, or Uber has already cancelled, expired or failed it, the button disappears. Confirm with Cancel Delivery in the prompt that follows. View in provider dashboard in the same footer opens Uber’s page for this delivery.
Customer Experience
The sections above describe what you see in the dashboard. This is what the customer sees on the order status page for the same delivery.Live Tracking
Customers see on your order status page:- Driver name and photo
- Real-time location on map
- Estimated arrival time
- Option to contact driver
Delivery Updates
Real-time status updates:- Driver assigned
- Driver heading to store
- Driver arrived at store
- Order picked up
- Driver en route to customer
- Delivered
Troubleshooting
No Delivery Created for a Paid Order
- Check Enable Uber Direct is on at the top of the page. Under Delivery account → Edit, confirm Credential pool is one you connected.
- Check Organisation in Delivery account shows Connected. If the store is on without an organisation, the page header shows Needs attention. Create the organisation from the setup checklist or Delivery account → Edit → Create organisation (step 3 above).
- Billing on the organisation may not be active yet with Uber — contact support with the order number.
No Drivers Available
If no drivers accept, Uber keeps searching. If the delivery is eventually cancelled, contact support so we can arrange the delivery manually where possible.Driver Cancellation
If a driver cancels, Uber reassigns the delivery and the customer sees an updated ETA.Wrong Vehicle Type / Order Too Large for a Bike
Uber chooses the courier and the vehicle. There is no vehicle-type, order-size or “car only” setting for Uber Direct in the storekit dashboard, and storekit does not send any such requirement to Uber: every item is passed as a small manifest item (catering orders as a single extra-large item), so a large order can still be matched to a bicycle or scooter courier. You do not have an Uber Direct account of your own to add drivers or vehicles to — deliveries run through storekit’s connection, so there is no Uber dashboard where you can choose or change the courier. If the courier who arrives cannot carry the order:- Open the order and click Details on the delivery tracker. The Courier section shows the courier’s name, phone number and vehicle badge — call them to agree what to do.
- If the order cannot go with that courier, click Cancel delivery and confirm with Cancel Delivery. This does not cancel the customer’s order.
- Contact support with the order number so we can arrange the delivery again where possible.
Who Is Responsible for the Delivery
storekit passes each delivery order to Uber Direct, which selects and manages the driver who collects and delivers it. Late pickups, no driver being assigned, or damage in transit are handled by the courier performing the delivery, not by storekit. storekit support can raise a claim or refund request with Uber Direct on your behalf, but any refund or compensation is subject to their approval. To start this, contact support.Best Practices
Accurate Prep Times
The pickup time sent to Uber comes from your store’s prep time — keep it realistic to avoid drivers waiting
Correct Store Phone Number
Drivers call the store’s phone number if they cannot find you
Secure Packaging
Package orders to survive transport
Sensible Delivery Zones
Keep zones within a distance Uber can serve reliably